Friday, March 23, 2012

New Car

Today we upgraded from this


To this...


It is quite the change.

Tuesday, March 20, 2012

DIY projects

I have been searching the internet quite a bit lately for some neat DIY projects. I just love how there seem to be step-by-step instructions on almost anything you want to do...it makes being a DIY'er that much easier.

The thing I love about fixing things up or decorating myself (as opposed to hiring someone else or buying new) is that you can get great things by reusing the old and for a much more affordable price. Or you can build something yourself that looks expensive but actually cost much less.

For example, my recent table-refinishing project (yes, I have yet to do the final reveal as I am letting it cure until the weekend) was inspired by my love for Harvest Tables, such as this one, which has almost the same dimensions as my table:

To put the money savings of my DIY table in perspective, I will tell you that this Harvest Table is selling for $1695.00.

My table costs are as follows:

Table (Found on Kijiji after a couple of months of keeping my eyes open): $250
Stain/Finish in one: $18
Sandpaper: $12
Bristle brush: $8
Tack cloth: $2
_______________
Grand total: About $290.

That is about a $1400 difference. Whoa. And let's compare the tables:


Yep...pretty much identical. It took me about 7 hours total to do the table. Totally worth the work and the effort. Plus, there is something so incredibly rewarding about doing it yourself...

I have been pinning a lot of new ideas for DIY projects lately, such as this one that I found on House & Home:


It's a bunch of old Hankies displayed on a wall! It is so pretty! I would love to try this, so I am pretty sure I'll have my eyes out for hankies in my future thrifting. If you're interested in this project, find more info here.


To sum it up, the things that make DIY projects so great:
- They save you money
- They often require reusing, re-purposing or renewing used objects (as opposed to buying new)
- They give you a great feeling of pride when you're done!

The things that make DIY projects not so great:
- I often buy things with a DIY purpose in mind and never get around to it...or have it on my to-do list for a long time. (i.e. my beautiful hutch that is still sitting unpainted in my sunroom...)

Any great DIY projects you've done lately? Or found lately that you want to try? Or have been meaning to get around to?

Sunday, March 18, 2012

March Break

I thought that during March Break I would have time to do many projects and write about them as well. It ends up we've been having summer-like weather here in Kitchener, and I have been out enjoying it too much to get much done! Joe and I have been out and about every day. It's been hard to even think about being in the house!

The past few days have been in the low 20's and sunny and beautiful. Joe and I were able to get up to Eugenia, where my Mum and her partner have recently moved. We spent the weekend hiking and checking out the local trails. Here are pictures of mysef, Joe and my Mum on the trails which are a small taste of the many beautiful sights we saw this weekend. This was right before Joe and I hiked about 8 km of the Bruce trail back to Eugenia. It was amazing! And unseasonably warm.


On the other hand, I did manage to get one of my projects done during these last few days of break.
I finally got to the hardware store to buy sandpaper, stain, and other supplies to refinish our kitchen table.

As you can see, while it is a nice and big table, the stain colour was definitely out-dated. It was also covered in marks and scratches (as pine tends to do). Feel free to look at the pictures alone if you don't feel like reading the boring how-to :)

Our pine table: Don't worry...we've been keeping our eyes out for some new chairs.
First, I sanded it down with a grittier sand-paper (120) to get rid of the original stain. I followed this with another sanding with a finer sand-paper (220) to smooth things out. The sanding was definitely the biggest challenge. Luckily, I took it outside and enjoyed the hot and sunny weather while doing it :) It was also great doing it outdoors as it helped me to avoid having a ton of dust to clean up.

Starting out the rougher sanding 
Lucky for me, I discovered that the legs/base were NOT finished, but only had stain on them. This saved so much work

Finishing off with a finer sanding to even things out
Notes: Always sand in the direction of the wood grains. Otherwise you may damage the wood and/or need to spend a lot of time sanding out the scratches you make. (Learned from example!)

Before applying stain, make sure you go over the entire surface very carefully with tack cloth or something similar, to get off any dust/sanding residue.

Next, I started my first coat. I chose to use the oil-based Minwax One-Step stain and finish. This made it so that I didn't need to stain a couple of coats and finish a couple more coats. It basically eliminated a lot of work.

When brushing on the stain, I used a real bristle brush and applied thin coats in the direction of the wood grain, again. It is important to do long, continuous stroked along the length of the table so that the  stain/finish doesn't have time to dry in sections that you still need to work on.

I brought the table back inside to our sunroom where it could dry overnight and not stink up the house

I did a very careful job on the legs/base since I only wanted to do one coat
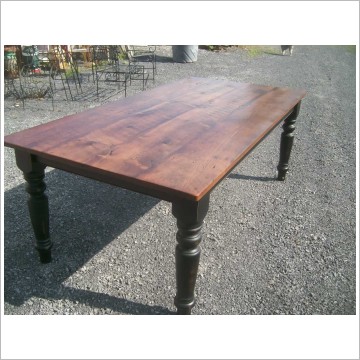
And after a lot of elbow grease, the first coat of stain was done. And I must say I'm pretty impressed with what it looks like! Since these pictures, I actually lightly sanded it down again and applied the second coat.


I will definitely be doing a follow-up post once it is in our kitchen and ready for use :) I think I'm going to leave it out in the sunroom to cure for a week or two, just to be super cautious.


And what was Joe doing while I was refinishing the table, you might ask? Well, he was inside cleaning the house and making pie of course :) Two mini ones for us to eat that day, and one to bring to my Mum's the next. I love my baker man. And our role-reversal!


And of course, the dramatic before and after:


Thursday, March 15, 2012

House plans

Yesterday Joe and I got into our new house for one of our visits before we move.
The main reason for the visit (other than just wanting to see it in person again) was to get some measurements so that we can start figuring out what furniture we have and where it can go, as well as anything else we might need to fill the space.

We took a lot of detailed measurements and now I'm working on drawing out the house to scale.
My sister gave me a really neat idea to measure our furniture and cut out mini versions to the same scale so that I can test out how the furniture would fit in different parts of the house or a room before deciding where to put them. I will definitely be trying this. I'm such a visual person that it has been challenging to picture the house. I think having an actual drawn plan will make things much easier.

For now, here are some of the plans I've started... I've only done the main floor so far.


For the record... I might have a bit of a...pencil problem? I didn't realise this until Joe teased me about the number of sharp pencils I had at the ready while drawing up these plans. Yep, I sat and sharpened about 10 pencils before even beginning. I like sharp pencils, ok?!


Monday, March 12, 2012

Budgeting

I'm in a bit of a place of limbo right now. We don't get the keys to our new home for just over 2 months. This means that for the next 2 months or so, I don't have anything to renovate or redo in the house. This also means that we are on a self-imposed tight budget to make sure everything runs smoothly.

Of course, I have a few small-ish project that I plan on getting to before we move, such as re-staining our kitchen table and perhaps repainting the thrift-store bargain hutch that we bought recently. However, our bigger focus right now is saving money to a) have a bigger down-payment for our new car that we pick up in 2 weeks;  b) to make sure that we have something to fall back on in case any unexpected costs come up when finalizing the purchase of our new house, and c) hopefully saving up enough to head to Europe this summer. (Yes, I am aware that we are a bit crazy).

Some of the ways that we have been saving money lately are the following:

  • Spending money on only the necessities (food, house and car expenses and other monthly bills)
  • Joe has been buying his beer by using money from the monk*. 
  • We have stopped going out for dinner and eat-in instead. (We were getting into the habit of going out for dinner about once a week to feed my green curry addiction.)
  • We have resisted the urge to make any impulse buys and only buy necessities.
  • We haven't been going thrifting as much. You might think thrifting doesn't cost much...but I'm sure it adds up, even if you're only buying small items. 
  • We walk instead of driving whenever possible.
  • We have been using up cans and dried goods and frozen foods that we already have.
  • Using up gift cards (you get many of these at Christmas as a teacher) and gift certificates (we went to the movies the other night using some gift certificates) when we want to go out on a date.
  • Doing free things like skating at the city hall rink, going for long walks on local trails, spending time with family/friends etc. 
I must say it hasn't been a big change from our norm. We tend to live pretty frugally, but now that we're budgeting a little differently I realize how often I did spend money here and there. We're lucky to be living in such a great location that walking is usually an option, and almost everything we need is close by. 


*What is the monk, you ask? Well... he is a horrendous monk-shaped cookie jar that Joe bought at a thrift store, that says "thou shalt not steal" on it. This is where Joe throws all of his leftover change. 

Saturday, March 10, 2012

Pinterest Project #1

I've already been trying a few ideas I found on Pinterest at home, and decided it makes sense to document how things actually work.

There are so many great recipes and tips that I've been pinning lately. One was about uses for vinegar. Don't get me wrong...using vinegar around the home is something I've been doing for a long time. But a couple that I hadn't thought of were using vinegar as 1. a rinse aid for your dishwasher; and 2. A natural fabric softener. (If you click on the picture it should bring you to the blog post which gave these ideas).


I decided to put this to the test.
As I mentioned in an earlier post, we bought new cutlery this past month. It is great...but when I put it through the dishwasher, it came out covered in water-spots. So, I took the aforementioned advice and put some vinegar in the rinse-aid dispenser.

And...it worked like a charm! Here is a photo showing a spoon from before I put the vinegar in, and one from the vinegar wash. Pretty cool! I give this Pinterest tip a 10/10.


I am considering trying out the vinegar as a fabric softener...although right now we don't use anything so I don't know if it's even worth it. Although sometimes I wish our towels were a little softer :) So we'll see.

Tuesday, March 6, 2012

The new car

Yesterday Joe and I made our decision.
We put a deposit down on the black Toyota Rav4 that we test drove on Saturday. Apparently someone else was asking to put in a deposit at the exact same time...but we got there first. So, we got the car. Well, we pick it up on March 23rd.


This was after much going back and forth, trying to decide if it's worth it, if it's the right financial and environmental decision. It all came down to the fact that we are outdoorsy and we want a family. And this is a good family car. We even stopped off at my sisters during our second test drive to see if a rear-facing seat would, indeed, fit in the car. It fit great!

It seems crazy to make this decision now, before having a family. Before even TRYING to start a family. Joe put it this way: Really, it's just a question of when we get this type of car. If not now, in a year? In two? It just makes sense for us. And it's going to last many, many years. (AND it saved us about $1000 in lease-end fees on the Yaris, which was a bonus).

Environmentally...well, it's definitely not the most fuel-efficient car. However, I feel I can justify this by the fact that Joe and I rarely drive. And we don't ever plan on being car-dependent. If anything, it will make us MORE aware of our car use, and we will probably use the car even less than we do currently.

Well, I'm still feeling a little strange about this purchase, but I think I'll be ok with it in the end.

Sunday, March 4, 2012

Where my mind is today.

I have a lot on my mind today.
I need to get it out on paper my blog!

1. First off, I want to put something to rest. My photo of the day project. I know I made it almost 1/6th of the year through. I could keep going. But I have found the past few weeks it has just felt like another thing on my "to-do" list. It's not something I've been looking forward to, or enjoying like I thought I would. Some days it was a scramble to find something to take a photo of. So, without further ado, I think it's time I stop. So, if you've been wondering where my new photos are...well, they don't exist. And they won't. I have decided I would prefer to record this year's happenings through writing. I have found since starting to write my blog it has become such a stress reliever for me. Writing things down puts things in perspective for me, which can be a good thing as I sometime have trouble looking at the bigger picture in life.

2. I mentioned in an earlier post that I was considering going car-free at the end of this month when the lease of my lovely Yaris ends. Joe and I went into the Toyota dealer yesterday to discuss our options, and now we are leaning toward something very different. It seems crazy, and a little backwards, but we are considering upgrading to a larger vehicle. (What?!) Our reasoning is that in a year or two, we will most likely be welcoming a new little one into our family. The Yaris doesn't seem very baby friendly, so we thought of what might make more sense. On top of that, we thought about all of the things we DO use our car for, like camping and skiing and bike trips...and they all seemed like they would be easier with a bigger car. All of that being said, we will still try our best to not use the car. It would be great incentive for me to find alternative ways (biking, busing) to get to work when we move in May to a home that is more than double the distance to my workplace than our current place.

3. The travel itch has re-entered our home. This summer, Joe and I have decided we are going to go to France and Belgium, and maybe Germany. Again, this may be the last summer there is only 2 of us, so we want to get our traveling in :) I'm really looking forward to visiting with my French host family again. I haven't seen them since 4 summers ago when they came to visit me in Canada. They haven't even met Joe! I can't wait to introduce them.

4. We move in 80 days.

5. How are we going to afford all of this?

6. I love my life.

Cleaning Stainless Steel

One of the things I loved about our home when I moved in was the stainless steel appliances in the kitchen. However, fairly quickly I became frustrated with them. Why? Because of their unmatchable ability to attract grease, water marks, fingerprints and any type of mess.

I tried various types of cleaners on them to try and get them shiny and streak-free. I even bought a specific stainless steel cleaner. Nothing seemed to work, and it was always a huge job to scrub them to have them be mostly streak free.

A few weeks ago I was talking to a co-worker who said she uses Norwex cloths and water to clean hers and it works really well. As I didn't have any Norwex cloths, I thought I would try it my own way.

First, let me show you what my oven looks like at the end of any given week (hence my frustration!)


Here is what you need: 
2 clean micro-fibre cloths; 1 damp with water, one dry. Yep, that's it.


All you do is wipe down the surface with the wet cloth in small sections. Then, immediately follow with the dry cloth and wipe the surface dry. Repeat until you've done the whole appliance. Et voilĂ ! A clean and shiny stove, once again!


The greatest part about this is that it takes about half as much work as I was doing with the cleaners, and looks better! Yes, it is things like this that make me happy. Is that sad? And again, the before and after for your viewing pleasure :)