Showing posts with label paint. Show all posts

Friday, January 3, 2014

A few DIY blunders

I don't know about you, but whenever Joe and I have holidays together, it usually means tackling a home project or two while we have the time. Unfortunately, this holiday, our projects weren't completely successful. (Don't worry...there are some successes among the mistakes!)

Let me tell you about the first blunder. Although the colours of the house were mostly neutrals when we moved in, both Joe and I felt that we needed to freshen them up and make them more "us". I vowed in this house NOT to paint everything beige and grey. 

When it came to our living/dining room (the biggest room in the house, which was painted a yellowy-beige colour), my biggest challenge was to find a paint that matched the original, oak trim in the windows, and that wasn't one of those light neutrals (even though in my heart I knew that would probably be best).

The "before" colour

 
So, I spent a lot of time going over inspiration photos online and looking at paint samples before I decided to go with a light blue-green called "Amusement Park" by Beauti-tone. We had already decided to paint the trim on the doors and baseboards white and started with that. Then we started painting. It became clear almost immediately that the colour was NOT what I had envisioned. It was coming out a light, frosty blue which came across as quite cold... definitely not the warm look I was going for. But, we kept going in hopes that once the original dark yellowy-beige colour was covered it would look right. Well... it didn't! It still looks quite cold looking.


Somehow...this photo makes it look how I wanted it to look!
Which brings me to my second blunder. Although I did spend too much a lot of time choosing the colour for the living/dining room, what I didn't consider was the rest of the main floor, or how the blue-green would look next to them. Not only was the colour not at all what I had envisioned, but it looked even worse next to the hallway and kitchen. Oh man. Unfortunately I was in such a painting frenzy that I forgot to take photo evidence of the mis-matchedness (although you can see a little bit in the photo above. And I'm too lazy to go photograph the kitchen mismatch.)

I thought that maybe painting the trim in the hallway would brighten things up and at least make the blue a little bit better.

Hallway before
Hallway before
When we bought our home, I always envisioned painting the trimwork. I know... painting original, almost 100 year old trim would seem like a HUGE no-no to a lot of people. In fact, I heard so many strong opinions against painting it that I doubted myself. However, I love the look of white trim (and really love the look of big, old trim that is painted), so I decided "this is my house, I want to live here a long time...I'm gonna do what I want!" And... well, I am quite happy with how the trim looks painted. Don't worry, that wasn't one of the blunders. (And I think I'll do a how-to post on painting the trim soon).
Hallway after
Hallway after
We also decided to take out the large, oak wardrobe that we had since it made the entry feel so much smaller and darker. And it was becoming a catch-all. So, we moved it to the back playroom to see if we can make it work. I'll give more details about our plans in my next post.


Fortunately, painting the trim also helped the blue look better next to the hallway. So there, one little success. (Although I'm still thinking about repainting the blue... we'll see)


Now let me tell you about the last blunder. I had always been up in the air about whether or not to paint the window frames white in the living/dining room. Quite frankly, the two larger windows are in beautiful condition. I mean, really, even for someone who doesn't love the natural trim look, they are so nice.

You can kind of see the trim quality in this terrible photo.
However, the smaller, stained glass window's frame is in not-so-good shape. It is full of nail-holes and has a lot of random paint splotches, and is generally just bad looking. So, while we were putting wood-filler in the trimwork of the hallway, I told Joe to do the same with the small window in hopes that it would look a little less ratty.


Well, apparently once you put on the wood filler, you are supposed to paint or stain it to match the trim and it is basically impossible to wipe away the excess filler. Basically... the wood filler made a hot mess of the trim, and we may need to paint. I may try one more time to get the excess off before doing so, but it is a little frustrating. Although, maybe it solved the painting debate... paint it is! (Or is it?)
Stay tuned.

Tuesday, December 10, 2013

Basement bathroom makeover!

When we moved into our house, the basement bathroom was kind of the house's dirty little secret. It was in definite need of some help. The previous owners had done some patching in there and I didn't repaint. On top of that, it had an old claw-foot tub that had been painted a textural pink, the existing wall colour was a soft peach, and the vanity brought back memory of our previous kitchen with it's melamine/oak cabinets. Joe said it was maybe the ugliest bathroom in the history of the world. (But really...did he forget our old bathroom in our old place before we painted it??!)


The strangest thing of all might have been the window... or lack thereof. Instead of a window there was a piece of Styrofoam in front of a storm window. For some reason it glowed red. It reminded me of Amsterdam come nighttime. Definitely not the vibe I generally go for in my home.


I didn't think the bathroom was going to be anywhere near the top of my to-do list, but then we got the basement windows replaced and I felt like it wasn't an impossible task. Then, I was going through all of the paints we have (leftovers from previous projects, and paints left by the previous owner) and realized that we could easily improve the look of the bathroom for free. With paint. So I did.


I started by painting the tub with a shiny black that was leftover from a previous project. Then I painted the trim and ceiling with the white I used in our old bathrooms, and the walls with leftover gray from the upstairs bathroom. I also painted the oak trim on the vanity, which hugely improved it's look without needing to replace it quite yet.


I put up some art we had and some matching hand towels, and voilĂ ! It actually looks decent. 


Of course, if I actually want it to be a nice washroom I would still need to replace the yellowed floors, the vanity and the old toilet, but for now it is just right!

Thursday, November 14, 2013

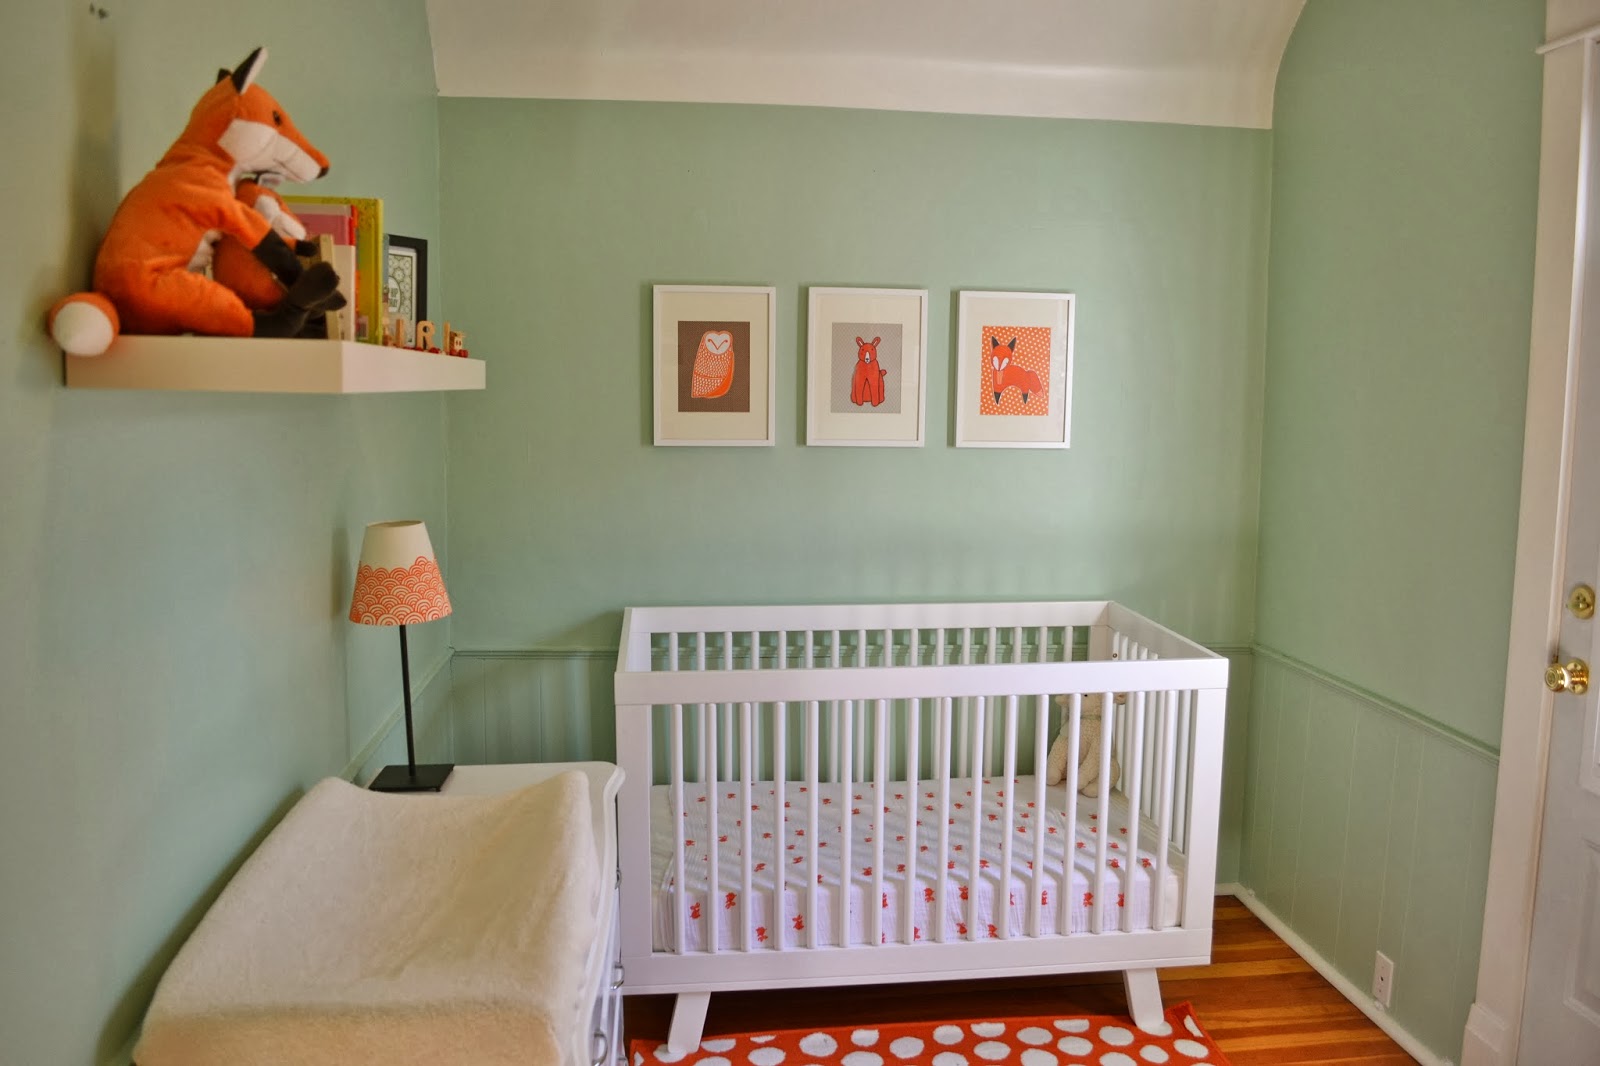
Henry's Orange & Mint Nursery

Our first new house project is complete! Or at least, as complete as it's going to be for now. As I had mentioned in my last post, we decided to go with an orange and mint nursery, as inspired by the nursery on this blog.

The first order of business was replacing the nursery furniture. Henry's nursery in our other house was a fairly large room (I think about 12 x 12 ft?), so when we put his furniture in his new nursery (which is much smaller, about 8 x 10 ft, with awkward doors on 3 walls) it seemed like the furniture was swallowing the space. Not good.


I noticed that a few of my favourite nurseries had the same crib in them (It is the Hudson by Babyletto)... and then I found it at a local shop, The Baby Boutique. It was fate.


We also decided to go back to using his first change table. It is a dresser we found on Kijiji for $30. It fits nice, although it is a bit trickier to fit all of his things in it! But it works since he also has a good-sized closet. 


When we first began painting, I was a little panicky. The paint was looking rather 90's sea-foam greenish. But as we continued painting it definitely grew on me. And once we put everything back into the room it began to come together. Thank goodness!


As for where we got things: Most things were budget/DIY/gifts/thrifted. Our one splurge was the crib, but we even got that on clearance since it was the floor model. (We saved $115 even though it was in perfect condition!) We got the shelf, frames and carpet at Ikea. 


I do still have a few small items on my wishlist. Although none of them are overly necessary - such as a bunting (this one, perhaps?), and maybe a new crib sheet and/or changing pad cover in oranges/tans/mint. I'm also trying to figure out a book display/storage so that they are within reach of the chair. For now, they're just in a basket.


We are pretty happy with how it has turned out!

Tuesday, April 23, 2013

Basement painting!


Our home has a large finished basement. When we moved in, like the rest of our house, the walls were an outdated pale yellow. The worst part was that the previous owners had fixed a few nail holes and painted over them with a different outdated pale yellow, making the walls all patchy. In the stairwell, the baseboards, ceiling and rails were ALL painted that same yellow. Barf. Since we only use the basement for the laundry room (for now), repainting wasn't exactly on the top of our to-do list. In fact, we have completely repainted the upper two floors and it was the last thing to paint.


The tiles in the basement are my favourite tiles in the house (maybe the only ones that are really my style at all.) However, they are a greyish colour that could make the basement look cold. So, I picked a grey-brown color that brought out the warmer tones in the tile. We also made sure to paint the rails, baseboards and ceiling in the stairwell white. As for the rest of the baseboards, which are not white, we decided to leave them for now. We will see if we get around to painting them white, too. We might also one day get around to replacing all of the light switches and outlets. They are all mismatched and either a yellow-beige colour or a metal. I often have trouble understanding why these were ever installed! Unfortunately, these are throughout the house...


All in all, the paint definitely updated the look of the basement and I'm quite happy with it. It still looks a little barren, so eventually we will need to find a carpet and some better fitting furniture. For now, it works! 


If only there were some trick to magically make the bar look nicer...

Thursday, March 21, 2013

Good-bye Clown Bathroom!


As I have already mentioned, Joe and I got a lot done over March Break.
One of the projects that we tackled was the downstairs bathroom. This was definitely the project I was the least excited about doing, especially after painting the upstairs bathroom (which you can read all about here). Painting tile is very finicky, and this bathroom had enough tile to sink a ship!

For  those of you who haven't seen our lovely basement bathroom, it earned the nickname "clown bathroom". I think the pictures speak for themselves on that one:


Isn't it frightening?! I have definitely questioned how that bathroom ever came to be on multiple occasions.

After having so much success painting our upstairs bathroom, I decided that I would do the same for this one. I needed Joe's help though... I mean, there was even colourful tile on the ceiling! Come on!

So, after a couple of days of elbow grease and 4 coats of primer and paint, it is finished! And we are Soooo happy it is done. I'm not going to say it is now a dream bathroom, but it is definitely livable. The best part was that we were able to reuse the primer and paint that I used in the upstairs bathroom, so this transformation was free!


We decided to keep the red door, mostly because we were sick of painting. But, maybe one day that will change.

Since it was a free makeover, I think I will splurge on a carpet and maybe some new hand towels to spruce things up. I will show you if and when that happens! The best part of this whole thing is that now I can go into the basement without being afraid!

As of now, the only thing we haven't repainted in the entire house is the basement itself. It is the last remnant of barfy yellow paint. For now, I think I'll focus on adding more interest to the rest of the house since we really don't use the basement.

To end it off, I leave you with a glorious before and after shot! (Ignore the bad quality... I couldn't be bothered to fix it today. You get the idea!)


Thursday, March 14, 2013

Kitchen update

Luckily for me, Joe is on March Break this week. That means we were easily able to finish the rest of the kitchen.

When we were given the estimate for refacing our cabinets from the guy who did it, he had put an extra $900 to paint the remaining surfaces. That put the estimate from $2100 (which included taking measurements, making cabinet and drawer fronts, painting them, installing and putting on hardware) up to $3000 (to do the painting on top of that). Since I am pretty comfortable painting, and on maternity leave income, we decided to do the rest of the painting ourselves, especially since the painting seemed a little expensive. I'm definitely glad! It took the two of us about 9 hours total (Me: 6 hours; Joe: 3 hours). And the finished product looks amazing! I was a little nervous doing the painting since there was no room for mess-ups, but we took our time and it worked really well. Plus, it saved us $100 per hour! Yes, please!

I am so excited to finally have my white shaker kitchen. I have been dreaming about it for a long time! Here are a few photos! We will probably add a window treatment of some kind to add a bit more colour. Otherwise, we are loving the way the granite and backsplash look now.


The only thing that is unfinished is the cabinet above the desk/ beside the fridge. Unfortunately they were measured wrong, so there is about 3/4 of an inch gap between the two cabinet doors. This is where we decided to add a large cabinet door to cover up the awkward shelving that was there before. Our cabinet guy said he should have it done in about a week. 


And here is a little before and after for your viewing pleasure!